
Launch Your 1st EC2 Instance On AWS Cloud
A Walk-Through Tutorial For Beginners: How To Launch Your 1st [Free] EC2 Instance On AWS Cloud.

اے ڈبلیو ایس کلاؤڈ پر پہلا مفت یعنی[ فری ٹیئر ای سی 2 انسٹانس ] لانچ کرنے کی عملی مشق
سلائیڈوں میں جو سکرین شاٹس لگے ہیں
وہی پھر سلائیڈوں کے نیچے بڑے کرکے دکھائے گئے ہیں۔

The Region at the Top-Right corner with account Title [3T-InfoTinker] is selected [Sydney]
دائیں طرف بالکل اپنے اکاؤنٹ نام کے قریب دیکھیں تو علاقہ [Region] نظرآرہا ہے، میں نے تو [Sydney ] سلیکٹ کر لیا ہے۔


Give a name to your Instance
اپنے انسٹانس کو نام دیں۔

Select an OS image
اس سلائیڈ میں آپریٹنگ سسٹم سلیکٹ کرنا دکھایا گیا ہے۔

I selected Ubuntu 24.04 server
میں نے أبنٹو 24 سرور سلیکٹ کیا ہے۔

The only Two Free Tier Eligible Images for Ubuntu
مجھے تو مبلغ دو عدد أبنٹو ہی نظر آئےجو کہ فری ٹیئر میں دستیاب ہیں۔

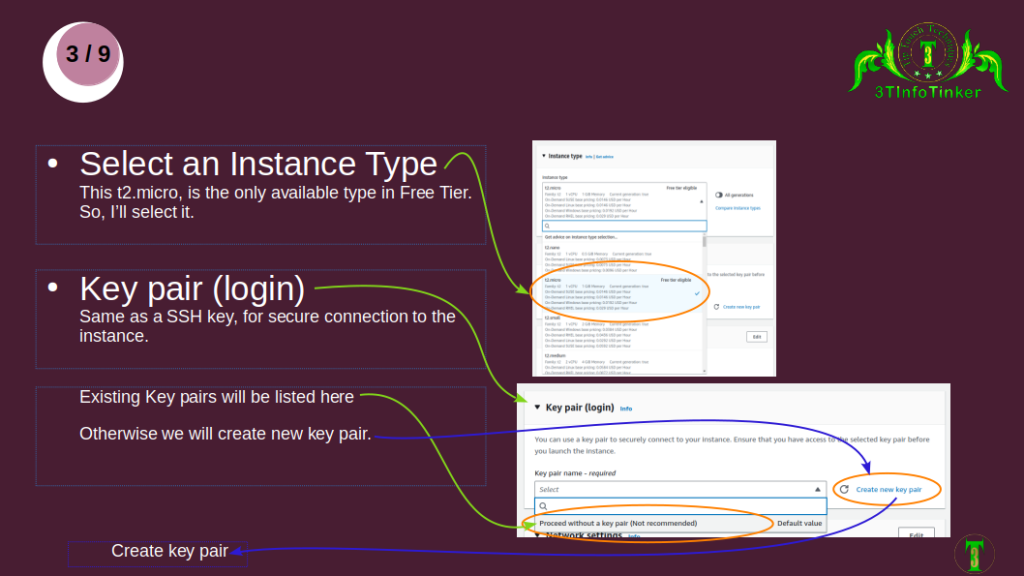
The only Free Tier Instance Type “t2.micro” is already selected.
ایک اکیلی انسٹانس ٹائپ پہلے سے سلیکٹڈ ہے۔[ ٹی2۔مائیکرو]

Need to create the Key pairst, Click the [Create new Key pair].
یہ ‘کی پیئر’ کچھ SSH سے ملتی جلتی چیز لگتی ہے۔ بنالیں


Use a task related name for the key pair.
کی پیئر کا نام اپنے انسٹانس سے ملتا جلتا رکھیں، تاکہ کل کو اگر کوئی اور انسٹانس بنائیں تو ناموں میں مغالطہ نہ ہو۔


I left these settings unchanged.
میں نے تو ان سیٹنگز کو بالکل بھی نہیں چھیڑا، جیسی ہیں ویسی ہی رہنے دی ہیں۔


The Max. Hard Disk size can only be 30 GiB
کل سائیز جو دستیاب ہے ہارڈ ڈسک سٹوریج کا وہ 30 جی بی ہی ہے۔کل سائیز جو دستیاب ہے ہارڈ ڈسک سٹوریج کا وہ 30 جی بی ہی ہے۔

Following image is showing the setting’s summary, we gave to our instance
ذیل میں دی گئی تصویر میں ہمارے انسٹانس کی سیٹنگزکی تفصیل نظر آرہی ہے، جو ہم نے دی ہیں۔

As we click the the “Launch instance” button. The following image shows the launching process which takes some moments depending on our local PC hardware and networks speed.
۔Launch Instance۔ کے بٹن 👆 کو پریس کرتے ہی نیچے دی گئی تصویر والی سکرین سامنے آجاتی ہے۔جوکہ ہمارے کمپیوٹر کی رفتار کے مطابق وقت لگا کر انسٹانس کو لوڈ ہوتا دکھاتی ہے۔


Clicking on the Instance ID (blue-in-brackets) will open up the details about instance.
اپنے انسٹانس کی تفاصیل دیکھنے کے لئے آپ بتائے گئے نیلے رنگ کے آئیڈیز کو کلک کر سکتے ہیں۔

by Ticking the “circled checkbox” and clicking “Connect” button will show the following options in Slide: 8/9, to choose for our connection to the instance.
انسٹانس کے بائیں طرف کے چھوٹے باکس کو چیک مارک کرکے پھر کنیکٹ کا بٹن پریس کرنے سے سلائیڈ نمبر 8۔ کے مطابق سکرین آجائے گی۔ اس میں ہم اپنے انسٹانس کے لئے اپنی مرضی کا کنیکش ٹائپ سلیکٹ کر سکتے ہیں


We have 4 types of connection to the instance:
- EC2 Serial Console
- EC2 Instance Connect
- Session Manager
- SSH Client
ہمارے پاس انسٹانس کنکشن کی ‘4’ اقسام ہیں:۔
۔1۔ EC2 سیریئل کونسول
۔2۔EC2 انسٹانس کنّیکٹ
۔3۔ سیشن مینیجر
۔4۔ SSH کلائینٹ

میری بلاگ پر وقت بیتانے کا شکریہ؛ امید ہے کہ میری کاوش کو آپ نے مفید پایا ہوگا۔
